


📢 转载信息
原文链接:https://www.kdnuggets.com/zero-budget-full-stack-building-with-only-free-llms
原文作者:Shittu Olumide
Zero Budget, Full Stack: Building with Only Free LLMs
Build a full-stack AI meeting summarizer with React, FastAPI, and free LLMs. Zero budget, complete code included
By Shittu Olumide, Technical Content Specialist on March 31, 2026 in Language Models

Image by Author
# Introduction
还记得曾经构建全栈应用程序需要昂贵的云积分、高价的API密钥和一整个工程师团队的日子吗?那些日子已经正式结束了。到2026年,开发者可以使用纯粹的免费工具来构建、部署和扩展生产级应用程序,包括为其提供智能的大型语言模型(LLMs)。
整个格局已经发生了翻天覆地的变化。开源模型现在能够挑战它们的商业竞争对手。免费的AI编码助手已经从简单的自动补全工具发展成为能够架构整个功能的完整编码代理。而或许最重要的是,你可以运行最先进的模型,无论是本地运行还是通过慷慨的免费套餐,而无需花费一分钱。
在本篇综合性文章中,我们将构建一个真实的应用程序——一个AI会议纪要汇总器。用户将上传语音录音,我们的应用程序将对其进行转录,提取关键点和行动项,并在一个整洁的仪表板中显示所有内容,所有这一切都完全使用免费工具。
无论你是一名学生、一个训练营毕业生,还是一个希望原型化想法的经验丰富的开发人员,本教程都将向你展示如何利用目前最好的免费AI工具。让我们从理解为什么免费LLM如今如此有效开始。
# Understanding Why Free Large Language Models Work Now
仅仅在两年前,构建一个AI驱动的应用程序就意味着要为OpenAI的API积分制定预算,或者租用昂贵的GPU实例。如今,经济形势已经发生了根本性的转变。
商业LLM与开源LLM之间的差距几乎已经消失。像智谱AI的GLM-4.7-Flash这样的模型证明了开源可以在实现最先进性能的同时,完全免费使用。同样,LFM2-2.6B-Transcript专门为会议摘要而设计,并且完全可以在设备上运行,质量达到云级别。
这对你来说意味着,你不再被锁定在单一供应商那里。如果一个模型不适合你的用例,你可以在不改变基础设施的情况下切换到另一个模型。
// Joining the Self-Hosted Movement
人们越来越倾向于在自己的硬件上运行本地AI模型,而不是将数据发送到云端。这不仅仅关乎成本;更关乎隐私、延迟和控制。借助Ollama和LM Studio等工具,你可以在笔记本电脑上运行强大的模型。
// Adopting the "Bring Your Own Key" Model
出现了一个新的工具类别:开源应用程序,它们是免费的,但需要你自己提供API密钥。这为你提供了最大的灵活性。你可以使用Google的Gemini API(每天提供数百次免费请求),或者使用完全本地的模型运行,没有任何持续成本。
# Choosing Your Free Artificial Intelligence Stack
分解我们应用程序每个组件的最佳免费选项,涉及选择在性能和易用性之间取得平衡的工具。
// Transcription Layers: Speech-to-Text
对于将音频转换为文本,我们有优秀的免费语音转文本(STT)工具。
| Tool | Type | Free Tier | Best For |
|---|---|---|---|
| OpenAI Whisper | Open-source model | Unlimited (self-hosted) | Accuracy, multiple languages |
| Whisper.cpp | Privacy-focused implementation | Unlimited (open-source) | Privacy-sensitive scenarios |
| Gemini API | Cloud API | 60 requests/minute | Quick prototyping |
对于我们的项目,我们将使用Whisper,你可以本地运行它,也可以通过免费托管选项使用。它支持超过100种语言,并生成高质量的转录文本。
// Summarization and Analysis: The Large Language Model
这是你拥有最多选择的地方。以下所有选项均完全免费:
| Model | Provider | Type | Specialization |
|---|---|---|---|
| GLM-4.7-Flash | Zhipu AI | Cloud (free API) | General purpose, coding |
| LFM2-2.6B-Transcript | Liquid AI | Local/on-device | Meeting summarization |
| Gemini 1.5 Flash | Cloud API | Long context, free tier | |
| GPT-OSS Swallow | Tokyo Tech | Local/self-hosted | Japanese/English reasoning |
对于我们的会议汇总器,LFM2-2.6B-Transcript模型特别引人注目;它就是为这个确切的用例而训练的,并且在不到3GB的RAM中运行。
// Accelerating Development: Artificial Intelligence Coding Assistants
在我们编写第一行代码之前,请考虑那些有助于我们在集成开发环境(IDE)中更高效地构建的工具:
| Tool | Free Tier | Type | Key Feature |
|---|---|---|---|
| Comate | Full free | VS Code extension | SPEC-driven, multi-agent |
| Codeium | Unlimited free | IDE extension | 70+ languages, fast inference |
| Cline | Free (BYOK) | VS Code extension | Autonomous file editing |
| Continue | Full open-source | IDE extension | Works with any LLM |
| bolt.diy | Self-hosted | Browser IDE | Full-stack generation |
我们的推荐:对于本项目,我们将使用Codeium,因为它提供无限免费套餐且速度快,并且我们将保留Continue作为备用,以备需要切换不同LLM提供商时使用。
// Reviewing the Traditional Free Stack
- Frontend: React (free and open-source)
- Backend: FastAPI (Python, free)
- Database: SQLite (file-based, no server needed)
- Deployment: Vercel (generous free tier) + Render (for backend)
# Reviewing the Project Plan
定义应用程序的工作流程:
- 用户上传音频文件(会议录音、语音备忘录、讲座)
- 后端接收文件并将其传递给Whisper进行转录
- 转录的文本被发送到LLM进行摘要
- LLM提取讨论的关键点、行动项和决定
- 结果存储在SQLite中
- 用户在整洁的仪表板中看到转录文本、摘要和行动项
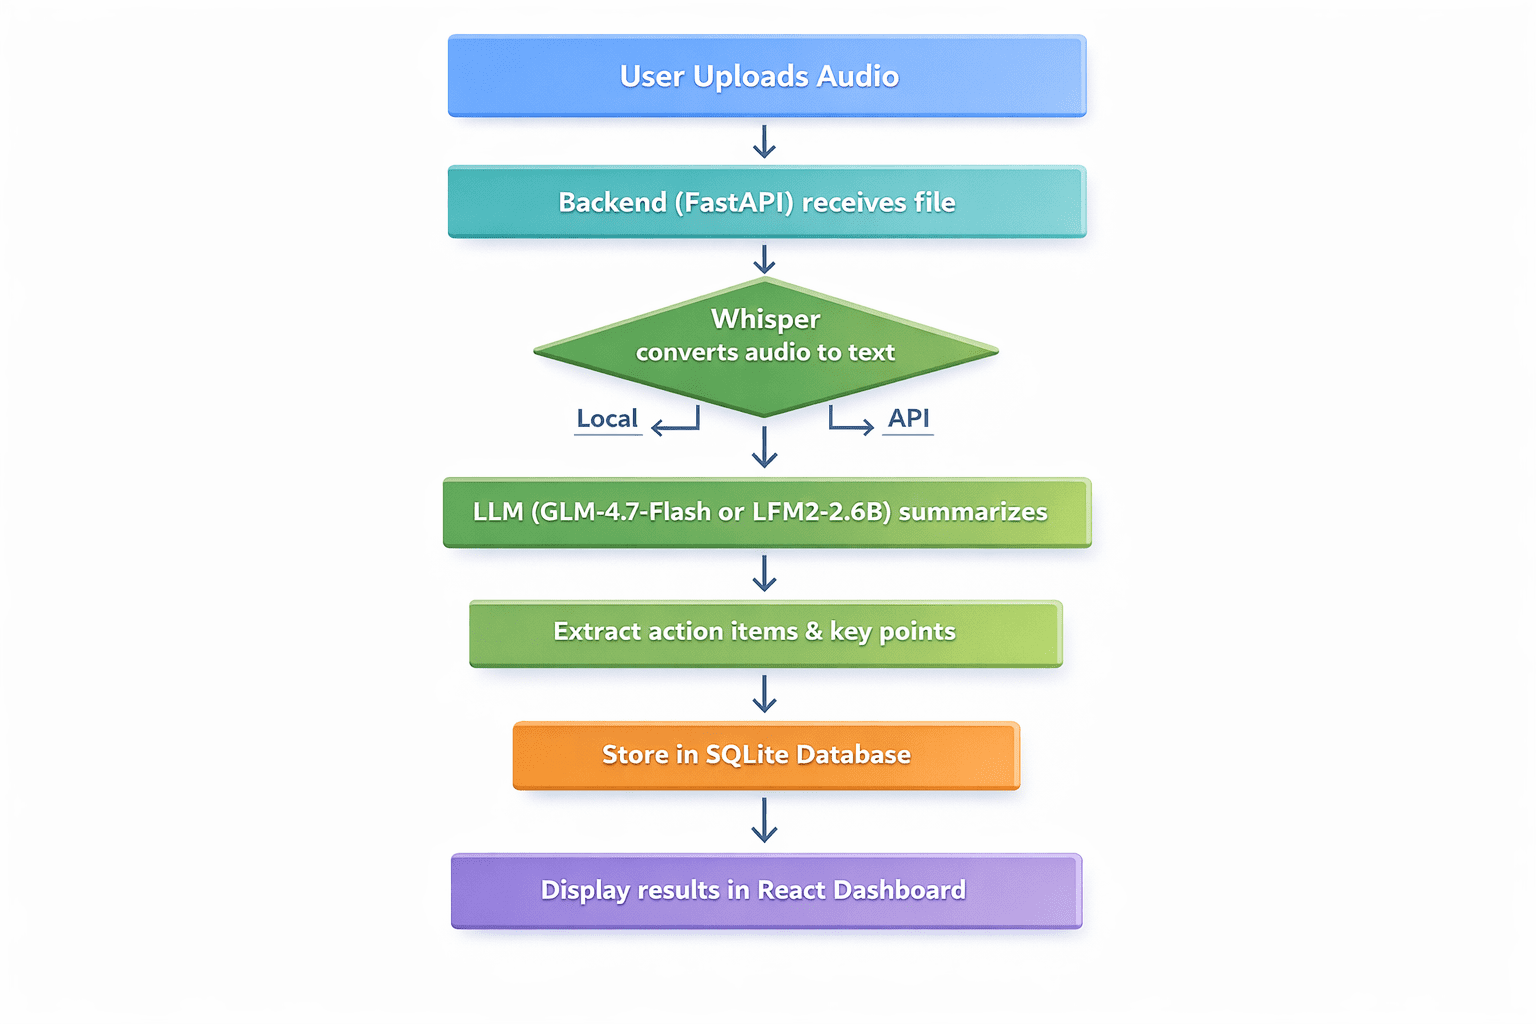
Professional flowchart diagram with seven sequential steps | Image by Author
// Prerequisites
- 已安装Python 3.9+
- 已安装Node.js和npm
- 基本熟悉Python和React
- 代码编辑器(推荐VS Code)
// Step 1: Setting Up the Backend with FastAPI
首先,创建我们的项目目录并设置一个虚拟环境:
mkdir meeting-summarizer cd meeting-summarizer python -m venv venv
激活虚拟环境:
# On Windows venv\Scripts\activate # On Linux/macOS source venv/bin/activate
安装所需的包:
pip install fastapi uvicorn python-multipart openai-whisper transformers torch openai
现在,创建我们的FastAPI应用程序的main.py文件并添加此代码:
from fastapi import FastAPI, File, UploadFile, HTTPException from fastapi.middleware.cors import CORSMiddleware import whisper import sqlite3 import json import os from datetime import datetime app = FastAPI() # Enable CORS for React frontend app.add_middleware( CORSMiddleware, allow_origins="["http://localhost:3000"]", allow_methods=["*"]", allow_headers=["*"]", ) # Initialize Whisper model - using "tiny" for faster CPU processing print("Loading Whisper model (tiny)...") model = whisper.load_model("tiny") print("Whisper model loaded!") # Database setup def init_db(): conn = sqlite3.connect('meetings.db') c = conn.cursor() c.execute('''CREATE TABLE IF NOT EXISTS meetings (id INTEGER PRIMARY KEY AUTOINCREMENT, filename TEXT, transcript TEXT, summary TEXT, action_items TEXT, created_at TIMESTAMP)''') conn.commit() conn.close() init_db() async def summarize_with_llm(transcript: str) -> dict: """Placeholder for LLM summarization logic""" # This will be implemented in Step 2 return {"summary": "Summary pending...", "action_items": []} @app.post("/upload") async def upload_audio(file: UploadFile = File(...)): file_path = f"temp_{file.filename}" with open(file_path, "wb") as buffer: content = await file.read() buffer.write(content) try: # Step 1: Transcribe with Whisper result = model.transcribe(file_path, fp16=False) transcript = result["text"] # Step 2: Summarize (To be filled in Step 2) summary_result = await summarize_with_llm(transcript) # Step 3: Save to database conn = sqlite3.connect('meetings.db') c = conn.cursor() c.execute( "INSERT INTO meetings (filename, transcript, summary, action_items, created_at) VALUES (?, ?, ?, ?, ?)", (file.filename, transcript, summary_result["summary"], json.dumps(summary_result["action_items"]), datetime.now()) ) conn.commit() meeting_id = c.lastrowid conn.close() os.remove(file_path) return { "id": meeting_id, "transcript": transcript, "summary": summary_result["summary"], "action_items": summary_result["action_items"] } except Exception as e: if os.path.exists(file_path): os.remove(file_path) raise HTTPException(status_code=500, detail=str(e))
// Step 2: Integrating the Free Large Language Model
现在,让我们来实现summarize_with_llm()函数。我们将展示两种方法:
Option A: 使用GLM-4.7-Flash API(云端,免费)
from openai import OpenAI async def summarize_with_llm(transcript: str) -> dict: client = OpenAI(api_key="YOUR_FREE_ZHIPU_KEY", base_url="https://open.bigmodel.cn/api/paas/v4/") response = client.chat.completions.create( model="glm-4-flash", messages=[ {"role": "system", "content": "Summarize the following meeting transcript and extract action items in JSON format."}, {"role": "user", "content": transcript} ], response_format={"type": "json_object"} ) return json.loads(response.choices[0].message.content)
Option B: 使用本地LFM2-2.6B-Transcript(本地,完全免费)
from transformers import AutoModelForCausalLM, AutoTokenizer import torch async def summarize_with_llm_local(transcript): model_name = "LiquidAI/LFM2-2.6B-Transcript" tokenizer = AutoTokenizer.from_pretrained(model_name) model = AutoModelForCausalLM.from_pretrained( model_name, torch_dtype=torch.float16, device_map="auto" ) prompt = f"Analyze this transcript and provide a summary and action items:\n\n{transcript}" inputs = tokenizer(prompt, return_tensors="pt").to(model.device) with torch.no_grad(): outputs = model.generate(**inputs, max_new_tokens=500) return tokenizer.decode(outputs[0], skip_special_tokens=True)
// Step 3: Creating the React Frontend
构建一个简单的React前端来与我们的API进行交互。在一个新的终端中,创建一个React应用:
npx create-react-app frontend cd frontend npm install axios
将src/App.js的内容替换为:
import React, { useState } from 'react'; import axios from 'axios'; import './App.css'; function App() { const [file, setFile] = useState(null); const [uploading, setUploading] = useState(false); const [result, setResult] = useState(null); const [error, setError] = useState(''); const handleUpload = async () => { if (!file) { setError('Please select a file'); return; } setUploading(true); const formData = new FormData(); formData.append('file', file); try { const response = await axios.post('http://localhost:8000/upload', formData); setResult(response.data); } catch (err) { setError('Upload failed: ' + (err.response?.data?.detail || err.message)); } finally { setUploading(false); } }; return ( <div className="App"> <header className="App-header"><h1>AI Meeting Summarizer</h1></header> <main className="container"> <div className="upload-section"> <input type="file" onChange={(e) => setFile(e.target.files[0])} disabled={uploading} /> <button onClick={handleUpload} disabled={!file || uploading}> {uploading ? 'Processing...' : 'Analyze'} </button> {error && <p className="error">{error}</p>} </div> {result && ( <div className="results"> <h4>Summary</h4><p>{result.summary}</p> <h4>Action Items</h4> <ul>{result.action_items.map((it, i) => <li key={i}>{it}</li>)}</ul> </div> )} </main> </div> ); } export default App;
// Step 4: Running the Application
- Start the backend: In the main directory with your virtual environment active, run
uvicorn main:app --reload - Start the frontend: In a new terminal, in the frontend directory, run
npm start - Open http://localhost:3000 in your browser and upload a test audio file
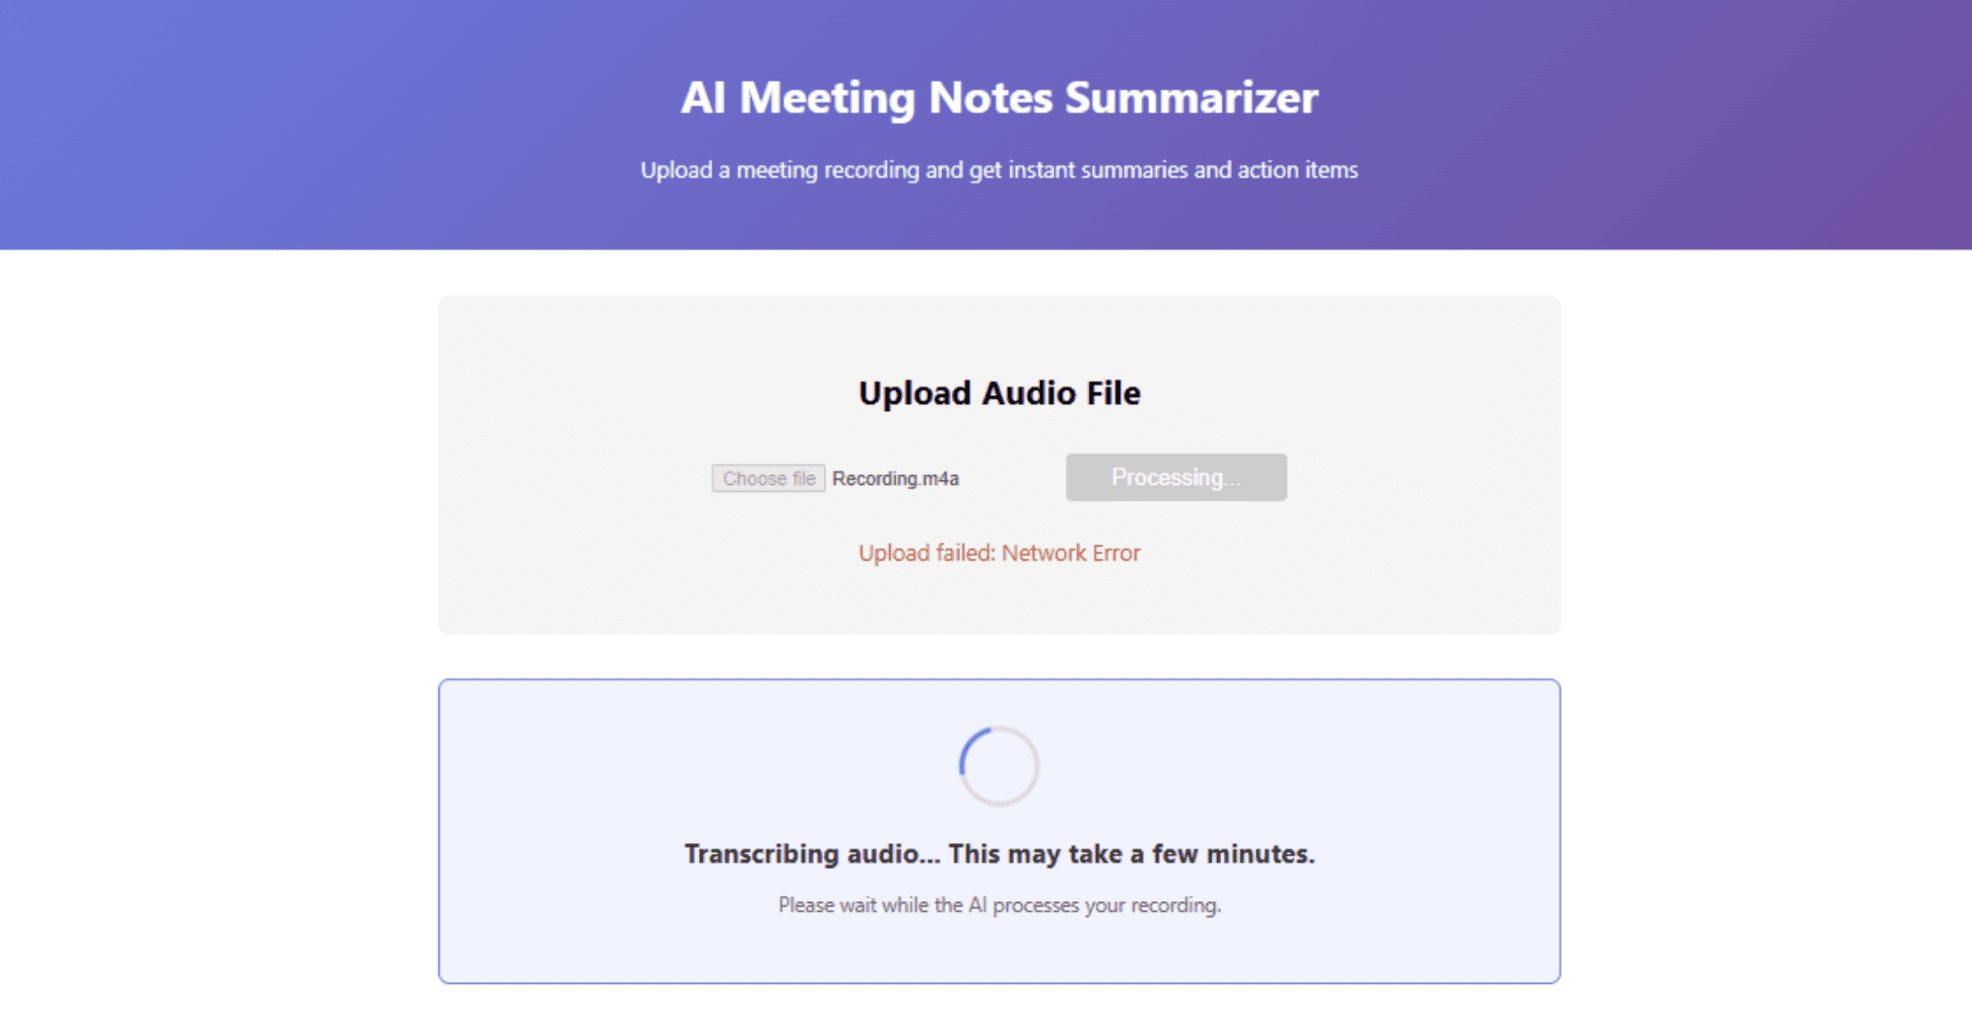
Dashboard interface showing summary results | Image by Author
# Deploying the Application for Free
Once your app works locally, it is time to deploy it to the world — still for free. Render offers a generous free tier for web services. Push your code to a GitHub repository, create a new Web Service on Render, and use these settings:
- Environment: Python 3
- Build Command:
pip install -r requirements.txt - Start Command:
uvicorn main:app --host 0.0.0.0 --port $PORT
Create a requirements.txt file:
fastapi uvicorn python-multipart openai-whisper transformers torch openai
Note: Whisper and Transformers require significant disk space. If you hit free tier limits, consider using a cloud API for transcription instead.
// Deploying the Frontend on Vercel
Vercel is the easiest way to deploy React apps:
- Install Vercel CLI:
npm i -g vercel - In your frontend directory, run
vercel - Update your API URL in
App.jsto point to your Render backend
// Exploring Local Deployment Alternatives
If you want to avoid cloud hosting entirely, you can deploy both frontend and backend on a local server using tools like ngrok to expose your local server temporarily.
# Conclusion
We've just built a production-ready AI application using nothing but free tools. Let's recap what we accomplished:
- Transcription: Used OpenAI's Whisper (free, open-source)
- Summarization: Leveraged GLM-4.7-Flash or LFM2-2.6B (both completely free)
- Backend: Built with FastAPI (free)
- Frontend: Created with React (free)
- Database: Used SQLite (free)
- Deployment: Deployed on Vercel and Render (free tiers)
- Development: Accelerated with free AI coding assistants like Codeium
The landscape for free AI development has never been more promising. Open-source models now compete with commercial offerings. Local AI tools give us privacy and control. And generous free tiers from providers like Google and Zhipu AI let us prototype without financial risk.
Shittu Olumide is a software engineer and technical writer passionate about leveraging cutting-edge technologies to craft compelling narratives, with a keen eye for detail and a knack for simplifying complex concepts. You can also find Shittu on Twitter.
🚀 想要体验更好更全面的AI调用?
欢迎使用青云聚合API,约为官网价格的十分之一,支持300+全球最新模型,以及全球各种生图生视频模型,无需翻墙高速稳定,文档丰富,小白也可以简单操作。
评论区